Proxies
- SSL bumping ile Ubuntu 22.04 üzerinde Squid Server 5.7
- Nginx http load balance ve ldap authentication
- Tengine derleme
- HaProxy sni bazlı trafik dağıtımı
- Namespace kullanarak, glb nin fougue tünel fonksiyonunun operasyon testi
- Temel Nginx konfigürasyonu
- Http sunucu kontrol modülü ile NGINX kurulum ve konfigürasyonu
- Debug custom rules using http headers with haproxy
SSL bumping ile Ubuntu 22.04 üzerinde Squid Server 5.7
Squid 5.7 yi ubuntu 20.04 üzerine compile ederek kaynaktan kurmak için yapılması gerekenler
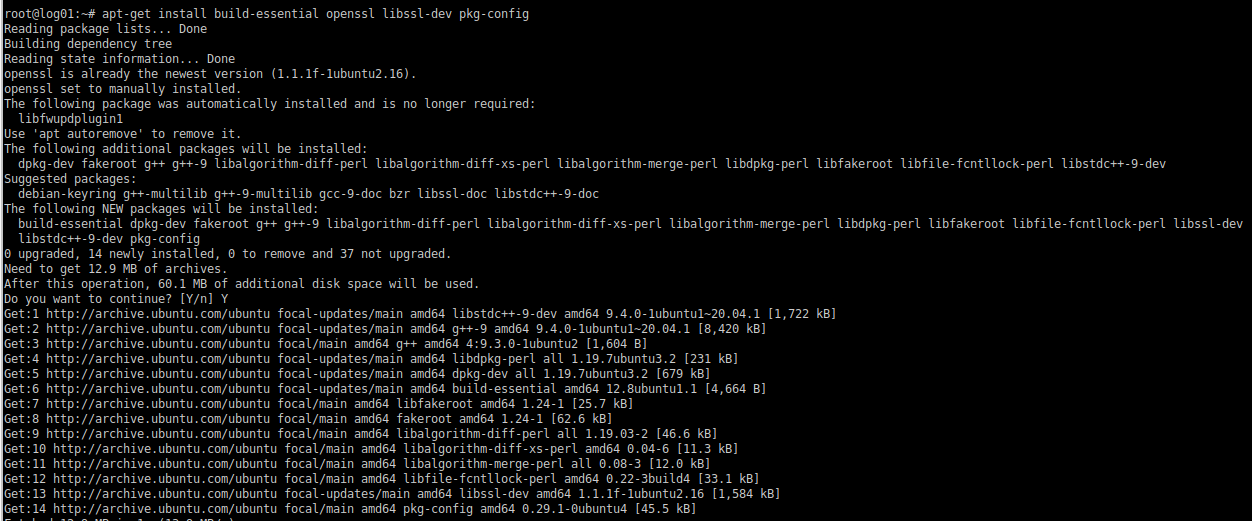
Derlemek için ön gereklilikler
apt-get install build-essential openssl libssl-dev pkg-config
Bu işlem bitince download ediyoruz
wget -c http://www.squid-cache.org/Versions/v5/squid-5.7.tar.gz

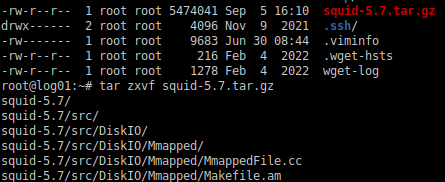
Download edilen kaynak dosyasını açıyoruz.
tar zxvf squid-5.7.tar.gz
Çıkardığımız klasöre geçiyoruz
Derleme
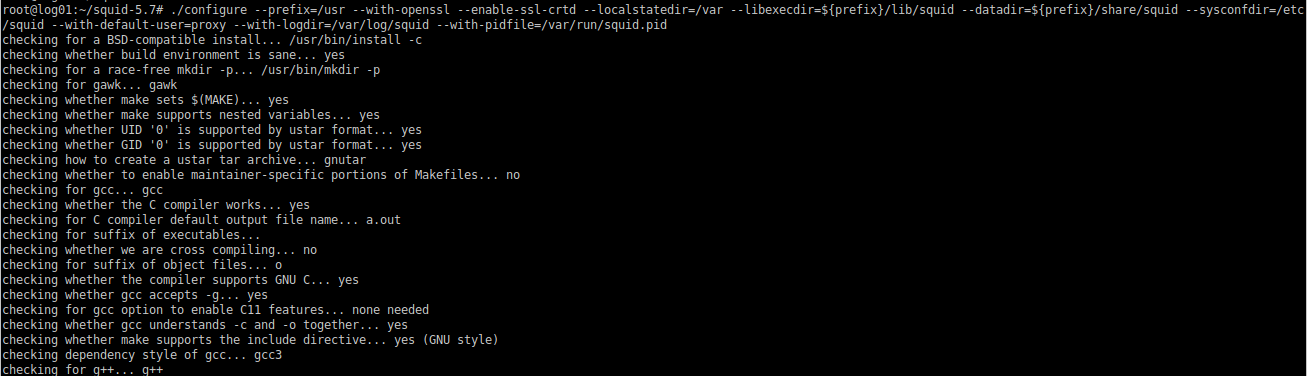
Aşağıdaki parametreler ile compile başlatıyoruz
./configure --prefix=/usr --with-openssl --enable-ssl-crtd --localstatedir=/var --libexecdir=${prefix}/lib/squid --datadir=${prefix}/share/squid --sysconfdir=/etc/squid --with-default-user=proxy --with-logdir=/var/log/squid --with-pidfile=/var/run/squid.pid
Hiçbir warning yada hata almadan bitmeli. Ardından derleme işlemini aşağıdaki komut ile başlatıyoruz. Bu 15 dakika kadar sürebiliyor.
make all
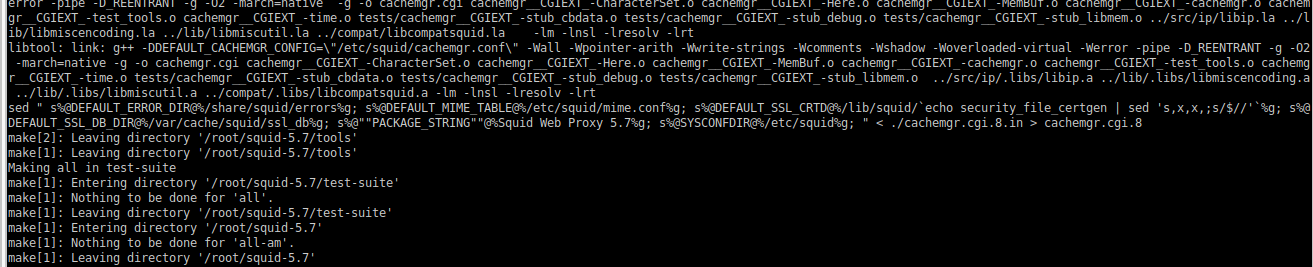
Make işlemi sorunsuz şekilde bittikten sonra
make install
yapıyoruz ve kurulum bitiyor.
Kontrol edelim.
squid -v
Aşağıdaki gibi görünmeli

Systemd dosyası
Systemd servisi Ubuntu 22.04 versiyon linux kurulumlarının sistem servis yöneticisidir. Bu yöneticiye squid için gerekli detayların eklenmesi gerekir.
Derleyerek kurduğumuz squid 5.7 systemd dosyasyı olmadan gelir, oluşturmak için aşağıdaki şablonu kullana bilirsiniz
## Copyright (C) 1996-2022 The Squid Software Foundation and contributors
##
## Squid software is distributed under GPLv2+ license and includes
## contributions from numerous individuals and organizations.
## Please see the COPYING and CONTRIBUTORS files for details.
##

[Unit]
Description=Squid Web Proxy Server
Documentation=man:squid(8)
After=network.target network-online.target nss-lookup.target

[Service]
Type=forking
PIDFile=/var/run/squid.pid
#ExecStartPre=/usr/sbin/squid -z
ExecStart=/usr/sbin/squid -f /etc/squid/squid.conf -d1
ExecStop=/usr/sbin/squid -k shutdown
ExecReload=/usr/sbin/squid -k reconfigure

[Install]
WantedBy=multi-user.target
Bu şablonu kopyalayıp aşağıdaki komutu kullanarak yeni systemd servis dosyasının içine kopyalayalım
sudo nano /lib/systemd/system/squid.service

kopyaladıktan sonra aşağıdaki gibi görünmelidir.
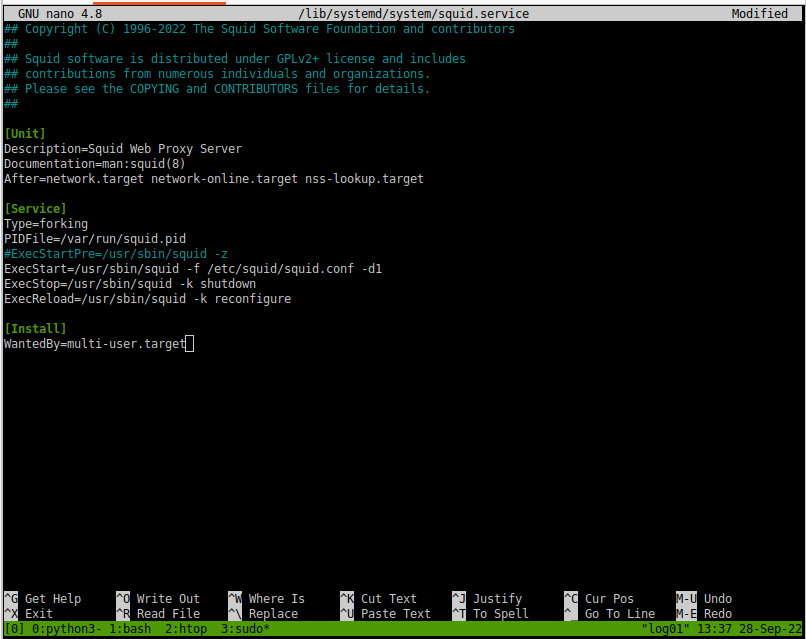
ctrl+x, yes, yes yapıp çıkıyoruz
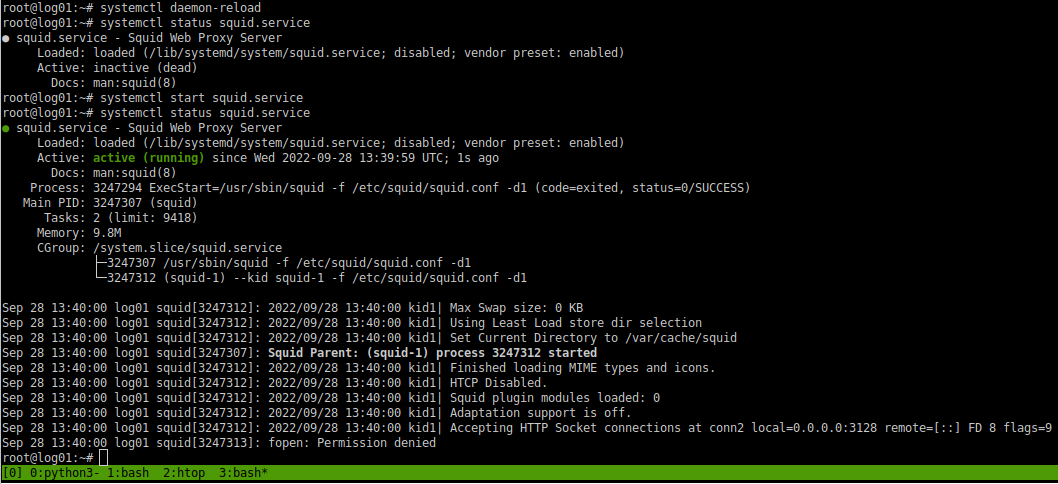
root@log01:~# systemctl daemon-reload
yapıp dameon dosyalarının yeniden yüklendiğine emin oluyoruz
systemctl status squid.service
yaptıktan sonra squid servisinin çalıştığını görebilirsiniz.
Konfigürasyon
squid konfigürasyon dosyalarının olduğu yere gidiyoruz
cd /etc/squid/
mevcut konfigürasyonu yedekliyoruz.
root@log01:/etc/squid# mv squid.conf squid.conf.disabled
Yeni konfigürasyonu yapıştıracağımız dosyayı nano kullanarak açıyoruz
root@log01:/etc/squid# nano squid.conf
Aşağıdaki şablonu yeni açtığımız dosya içerisine kaydediyoruz.
# Recommended minimum configuration:
#
##
# NTLM
##
#auth_param ntlm program /usr/bin/ntlm_auth --diagnostics --helper-protocol=squid-2.5-ntlmssp --domain=BANKA
#auth_param ntlm children 10
#auth_param ntlm keep_alive off
#icap_send_client_username on
#acl lan proxy_auth REQUIRED


# Example rule allowing access from your local networks.
# Adapt to list your (internal) IP networks from where browsing
# should be allowed
acl localnet src 0.0.0.1-0.255.255.255	# RFC 1122 "this" network (LAN)
acl localnet src 10.0.0.0/8		# RFC 1918 local private network (LAN)
acl localnet src 100.64.0.0/10		# RFC 6598 shared address space (CGN)
acl localnet src 169.254.0.0/16 	# RFC 3927 link-local (directly plugged) machines
acl localnet src 172.16.0.0/12		# RFC 1918 local private network (LAN)
acl localnet src 192.168.0.0/16		# RFC 1918 local private network (LAN)
acl localnet src fc00::/7       	# RFC 4193 local private network range
acl localnet src fe80::/10      	# RFC 4291 link-local (directly plugged) machines

acl SSL_ports port 443
acl Safe_ports port 80		# http
acl Safe_ports port 21		# ftp
acl Safe_ports port 443		# https
acl Safe_ports port 70		# gopher
acl Safe_ports port 210		# wais
acl Safe_ports port 1025-65535	# unregistered ports
acl Safe_ports port 280		# http-mgmt
acl Safe_ports port 488		# gss-http
acl Safe_ports port 591		# filemaker
acl Safe_ports port 777		# multiling http

#
# Recommended minimum Access Permission configuration:
#
# Deny requests to certain unsafe ports
http_access deny !Safe_ports

# Deny CONNECT to other than secure SSL ports
http_access deny CONNECT !SSL_ports

# Only allow cachemgr access from localhost
http_access allow localhost manager
http_access deny manager

# We strongly recommend the following be uncommented to protect innocent
# web applications running on the proxy server who think the only
# one who can access services on "localhost" is a local user
#http_access deny to_localhost

#
# INSERT YOUR OWN RULE(S) HERE TO ALLOW ACCESS FROM YOUR CLIENTS
#

# Example rule allowing access from your local networks.
# Adapt localnet in the ACL section to list your (internal) IP networks
# from where browsing should be allowed


#http_access allow localnet
http_access allow localhost


# And finally deny all other access to this proxy
http_access allow all

# Squid normally listens to port 3128
#http_port 3128
http_port 3128 tcpkeepalive=60,30,3 ssl-bump generate-host-certificates=on dynamic_cert_mem_cache_size=20MB cert=/etc/squid/bump.crt key=/etc/squid/bump.key cipher=HIGH:MEDIUM:!LOW:!RC4:!SEED:!IDEA:!3DES:!MD5:!EXP:!PSK:!DSS options=NO_TLSv1,NO_SSLv3,NO_SSLv2,SINGLE_DH_USE,SINGLE_ECDH_USE tls-dh=prime256v1:/etc/squid/bump_dhparam.pem

# Uncomment and adjust the following to add a disk cache directory.
#cache_dir ufs /var/cache/squid 100 16 256

# Leave coredumps in the first cache dir
coredump_dir /var/cache/squid

#
# Add any of your own refresh_pattern entries above these.
#
refresh_pattern ^ftp:		1440	20%	10080
refresh_pattern ^gopher:	1440	0%	1440
refresh_pattern -i (/cgi-bin/|\?) 0	0%	0
refresh_pattern .		0	20%	4320
sslcrtd_program /usr/lib/squid/security_file_certgen -s /var/lib/squid/ssl_db -M 20MB
sslproxy_cert_error allow all
ssl_bump stare all
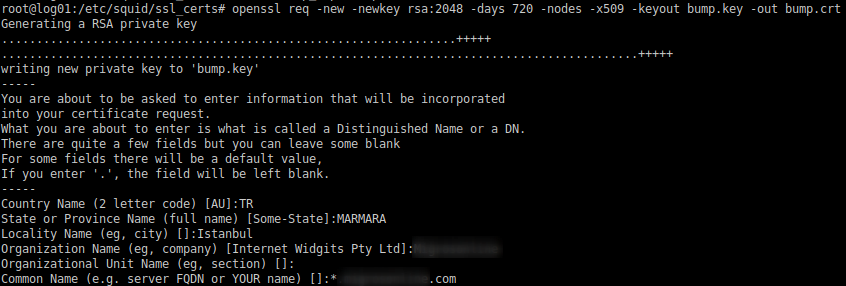
Sertifikalandırma
kullanıcılara gönderilecek sertifikayı generate ediyoruz
openssl req -new -newkey rsa:2048 -days 720 -nodes -x509 -keyout bump.key -out bump.crt
Otomatik sertifika jenerasyonu için kullanacağımız parametrelere örnek dosyayı oluşturuyoruz.
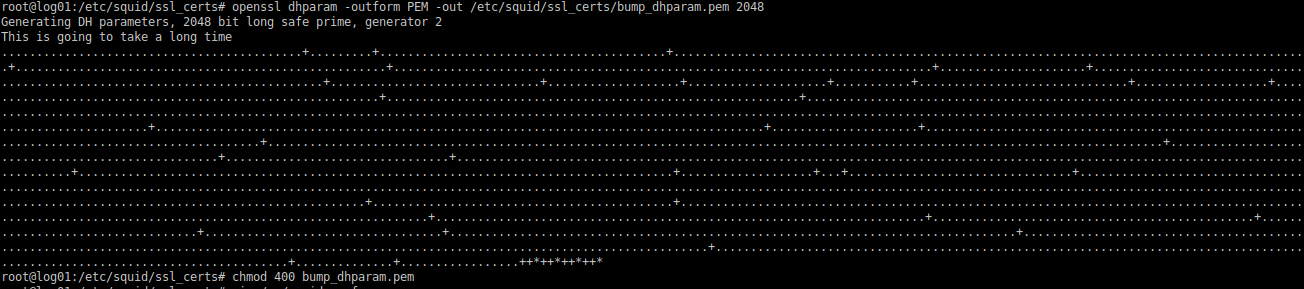
openssl dhparam -outform PEM -out /etc/squid/ssl_certs/bump_dhparam.pem 2048
chmod 400 bump_dhparam.pem
Sertifikanını güvenlik ayarlarını yapıyoruz
chown proxy:proxy /etc/squid/bump*
chmod 400 /etc/squid/bump*
Ubuntu için çalışacak olan ssl sertifikalarını içeren klasör ve veri tabanını oluşturuyoruz
mkdir -p /var/lib/squid/ssl_db
/usr/lib/squid/ssl_crtd -c -s /var/lib/squid/ssl_db
devreye alma
Yukarıdaki adımların tamamını yaptıktan sonra,
systemctl restart squid.services
ve kontrol için
systemctl status squid.service
Bu noktadan sonra ;
- oluşturduğumuz ssl sertifikasını clientlara gönderip trusted root authorities klasörüne import ediyoruz
- client üzerinde proxy ayarlarını sunucu_ip _adresi:3128 gösterecek şekilde yapıyoruz.
test için
curl -kv -x http://172.17.21.7:3128 https://docs.mikronet.tech
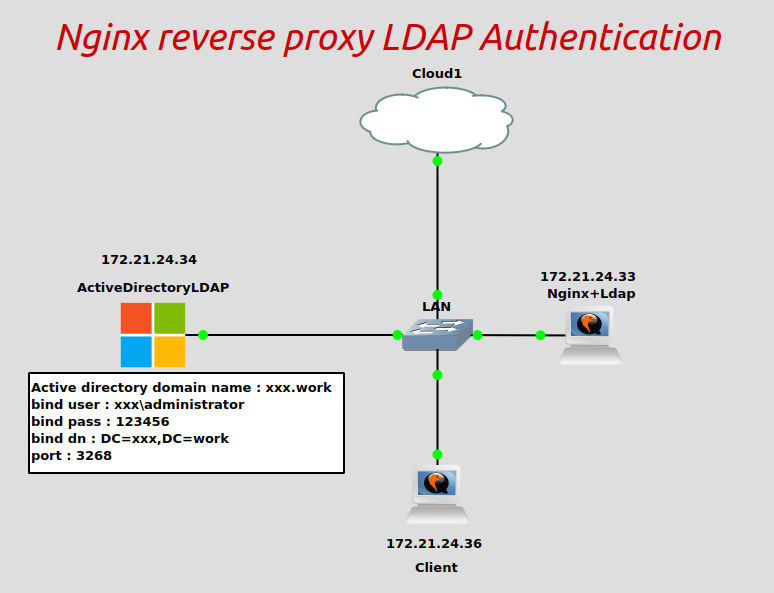
Nginx http load balance ve ldap authentication
Bu dökümanı takip edebilmek için admin seviyesinde linux tecrübesi gereklidir. Bu seviyede tecrübeniz eksik ise teknik destek ekibimizden yardım alabilirsiniz.
Bir müşterimizde kibana önüne koymak üzere active directory ldap entegrasyonu ile birlikte nginx reverse proxy çalıştırmamız gerekiyordu
Malum ngnix plus içerisinde gerekli modül pre-install şeklinde bulunyor fakat opensource olan versiyonda bu modülü bulamıyoruz.
Ancak,
https://github.com/kvspb/nginx-auth-ldap
Adresinden, opensource versiyon ile de kullanılabilen bir modülü indirebiliriz. modülü kullanabilmek için bir kaç ön şart var bunlar aşağıdaki gibi ;
- Ubuntu/Debian repolarındaki nginx bu modülü içermiyor bu sebeple source code kullanarak compile etmemiz gerekiyor
- Compile etmeden önce birkaç paket var bunları kurmak gerekiyor.
- kurduktan sonra da nginx.conf ve reverse proxy konfigürasyon içeriğinde bu modülü ve ayarlarını yapmak gerekiyor.
Kuruluma devam etmeden önce ;
a. Bu install şekli internete açılacak şekilde kullanılmamalıdır.
b. Brute force gibi tekniklere açıktır.
c. Ldap bind için kullanılan hesabın şifresi cleartext saklanır dolayısı ile bu servisin çalıştığı makina harden edilmelidir
d. örnekte protokol olarak ldap kullandım işiniz bitince ldaps ve port değişikliğini yapmayı kesinlikle unutmayınız.
Yukarıdaki uyarıları anladığınıza emin olduktan sonra sırasıyla ;
-
Nginx compile edebilmek için gerekli paketleri kuruyoruz
bu detayda, repositoryleri enable ettikten sonra compile edebilmek için gerekli kütüphaneleri yüklüyoruz
 $ sudo -i #<-- sudo yapbilen bir kullanıcının şifresini girelim
 $ sudo add-apt-repository universe
 $ sudo add-apt-repository multiverse
 $ sudo apt update
 $ sudo apt upgrade
 $ sudo apt install ldap-utils zlib1g build-essential gcc make libldap2-dev libssl-dev libpcre3-dev
kurulumlar bittikten sonra reboot ediyoruz
-
Git kullanarak modülü indiriyoruz
$ cd ~/Downloads $ git clone https://github.com/kvspb/nginx-auth-ldap $ cd nginx-auth-ldap $ git pull -
Nginx source code indiriyor ve deflate ediyoruz
Ben bu denemem de nginx-1.21.6 versiyonunu kullandım
$ cd ~/ $ wget -c http://nginx.org/download/nginx-1.21.6.tar.gz $ tar zxvf nginx-1.21.6.tar.gz $ cd nginx-1.21.6 -
./configure, make, sudo make instal Bu aşamada nginx i compile edeceğiz bunun için aşağıdaki komutu kullanacağız
./configure --user=nginx --group=nginx --prefix=/etc/nginx --sbin-path=/usr/sbin/nginx --conf-path=/etc/nginx/nginx.conf --pid-path=/var/run/nginx.pid --lock-path=/var/run/nginx.lock --error-log-path=/var/log/nginx/error.log --http-log-path=/var/log/nginx/access.log --with-http_gzip_static_module --with-http_stub_status_module --with-http_ssl_module --with-pcre --with-file-aio --with-http_realip_module --add-module=/root/nginx-auth-ldap/ --with-ipv6 --with-debugBütün compile işi sorunsuz tamamlandıktan sonra ;
$ make $ sudo make install -
systemd değişiklikleri
nginx compile edilerek kurulduğunda, systemd service unit dosyası olmadan kuruluyor bunu maalesef elimizle yapmak zorunda kalıyoruz. Bunun için yukarıdaki compile metoduna göre aşağıdaki unit içeriğini kopyalayabilirsiniz
 [Unit]
 Description=A high performance web server and a reverse proxy server
 Documentation=man:nginx(8)
 After=network.target nss-lookup.target

 [Service]
 Type=forking
 PIDFile=/var/run/nginx.pid
 ExecStartPre=/usr/sbin/nginx -t -q -g 'daemon on; master_process on;'
 ExecStart=/usr/sbin/nginx -g 'daemon on; master_process on;'
 ExecReload=/usr/sbin/nginx -g 'daemon on; master_process on;' -s reload
 ExecStop=-/sbin/start-stop-daemon --quiet --stop --retry QUIT/5 --pidfile /run/nginx.pid
 TimeoutStopSec=5
 KillMode=mixed

 [Install]
 WantedBy=multi-user.target
yukarıdaki içeriği /lib/systemd/system/nginx dosyasına yapıştırıp kaydedip çıkın
$sudo nano /lib/systemd/system/nginx -
Ldap-auth modülünün çalışabilmesi için gerekli nginx.conf değişiklikleri
Bu adımda ldap-auth modülünü nginx'e eklemek için
/etc/nginx/nginx.confDosyasını nano ile açıp aşağıdaki içeriği http protokolüne ekliyoruz
 http {
 	include /etc/nginx/conf.d/*.conf;
 	auth_ldap_cache_enabled on;
     auth_ldap_cache_expiration_time 1000;
     auth_ldap_cache_size 1000;
     ldap_server adds {
     	url "ldap://172.21.24.34:3268/DC=xxx,DC=work?sAMAccountName?sub?(ObjectClass=user)";
         binddn "XXX\administrator";
         bind_passwd "12qwasZX";
         require_valid_user;
         ssl_check_cert off;
Bu işlem tamamlandıktan sonra default konfig olan ve yine nginx.conf dosyası içindeki server { başlığını comment out ediyoruz
-
Reverse proxy tanımı /etc/nginx/conf.d içerisine
$sudo nano /etc/nginx/conf.d/kibana.confaşağıdaki detayları kendinize göre değiştirerek yapıştırabilirisiniz
upstream kibana { server kibana_ip_adresi:port_numarası; } server { listen 80; server_name default_server; location / { auth_ldap "Enter AD credentials like 'mesut.bayrak@xxx.work'"; auth_ldap_servers adds; proxy_set_header Host $host; proxy_pass http://kibana; } } -
Testler
Yukarıdaki tanımlar bittikten sonra
$sudo nginx -thata görmezseniz,
$sudo nginx restartyazarak ldap authentication modüllü bu çözümü kullanabilirsiniz.
Bu konuda mesut[at]netdev.com.tr den, destek alabilirsiniz
Tengine derleme
Gerekli paketler
apt install git build-essential libjemalloc-dev libatomic-ops-dev libpcre3 libpcre3-dev zlib1g zlib1g-dev libssl-dev libgd-dev libgeoip-dev
extra modüller
https://github.com/vozlt/nginx-module-vts.git
https://github.com/FRiCKLE/ngx_cache_purge.git
https://github.com/yaoweibin/nginx_upstream_check_module.git
https://github.com/GetPageSpeed/ngx_security_headers.git
https://github.com/openresty/headers-more-nginx-module.git
Compile
#!/bin/bash
./configure \
--with-poll_module \
--with-threads \
--with-file-aio \
--with-http_ssl_module \
--with-http_v2_module \
--with-http_realip_module \
--with-http_image_filter_module \
--with-jemalloc \
--with-libatomic \
--with-http_sub_module \
--with-http_flv_module \
--with-http_mp4_module \
--with-http_stub_status_module \
--with-mail_ssl_module \
--with-debug \
--with-stream \
--without-http_fastcgi_module \
--without-http_uwsgi_module \
--without-http_scgi_module \
--add-module=/var/nginx-module-vts \
--add-module=/var/ngx_cache_purge \
--add-module=/var/nginx_upstream_check_module \
--add-module=/var/ngx_security_headers \
--add-module=/var/headers-more-nginx-module \
--add-module=/var/tengine-2.3.2/modules/ngx_http_upstream_vnswrr_module \
--add-module=/var/tengine-2.3.2/modules/ngx_http_upstream_session_sticky_module \
--user=nginx \
--prefix=/etc/nginx \
--sbin-path=/usr/sbin/nginx \
--conf-path=/etc/nginx/nginx.conf \
--pid-path=/var/run/nginx.pid \
--http-log-path=/var/log/nginx/access.log \
--error-log-path=/var/log/nginx/error.log \
--with-http_image_filter_module=dynamic \
--with-http_geoip_module=dynamic \
--with-mail=dynamic \
--http-client-body-temp-path=/tmp/client-body-temp \
--http-proxy-temp-path=/tmp/proxy-temp \
make && make install
unit file
[Unit]
Description=A high performance web server and a reverse proxy server
After=network.target
[Service]
Type=forking
PIDFile=/var/run/nginx.pid
ExecStartPre=/usr/sbin/nginx  -t -q -g 'daemon on; master_process on;'
ExecStart=/usr/sbin/nginx -g 'daemon on; master_process on;'
ExecReload=/usr/sbin/nginx -g 'daemon on; master_process on;' -s reload
ExecStop=-/sbin/start-stop-daemon --quiet --stop --retry QUIT/5 --pidfile /var/run/nginx.pid
TimeoutStopSec=5
KillMode=mixed
LimitNOFILE=1048576
LimitNPROC=1048576
Restart=on-failure
RestartSec=10s
[Install]
WantedBy=multi-user.target[Unit]
Description=A high performance web server and a reverse proxy server
After=network.target
[Service]
Type=forking
PIDFile=/var/run/nginx.pid
ExecStartPre=/usr/sbin/nginx  -t -q -g 'daemon on; master_process on;'
ExecStart=/usr/sbin/nginx -g 'daemon on; master_process on;'
ExecReload=/usr/sbin/nginx -g 'daemon on; master_process on;' -s reload
ExecStop=-/sbin/start-stop-daemon --quiet --stop --retry QUIT/5 --pidfile /var/run/nginx.pid
TimeoutStopSec=5
KillMode=mixed
LimitNOFILE=1048576
LimitNPROC=1048576
Restart=on-failure
RestartSec=10s
[Install]
WantedBy=multi-user.target
Tengine Conf
worker_processes 15;
worker_cpu_affinity auto 1111111111111110;
worker_rlimit_nofile    1048576;
user nginx;
error_log       /var/log/nginx/error.log warn;
pid        /var/run/nginx.pid;
events {
worker_connections  1048576;
use     epoll;
multi_accept    on;
accept_mutex    on;
}
#don't need stream conf
worker_shutdown_timeout 300;
http {
#access_log on;
gzip_clear_etag off;
vhost_traffic_status_zone shared:vhost_traffic_status:128m;
map_hash_max_size 20480;
map_hash_bucket_size 20480;
map $status $loggable {
    ~^[23]  0;
    default 1;
}
sendfile        on;
tcp_nopush      on;
tcp_nodelay     on;
client_header_timeout   1m;
client_body_timeout     1m;
client_header_buffer_size       2k;
client_body_buffer_size 512k;
client_max_body_size    500m;
large_client_header_buffers     8       16k;
send_timeout    30;
keepalive_timeout       60;
keepalive_requests 100000;
reset_timedout_connection       on;
server_tokens   off;
server_name_in_redirect off;
server_names_hash_max_size      1024;
server_names_hash_bucket_size   1024;
check_shm_size 2000m;
proxy_buffer_size 16k;
proxy_buffers 4 16k;
proxy_busy_buffers_size 16k;
proxy_next_upstream off;
more_clear_headers Server;
more_clear_headers server;
log_format secops 'default TENGINE  Message 0 0 : "WEBLOG:~'
                  '$time_local~'
                  '$remote_addr~'
                  '$http_x_client_ip~'
                  '$http_True_Client_IP~'
                  '$request_method~'
                  '$upstream_http_X_Proxy_Cache~'
                  '$uri~'
                  '$query_string~'
                  '$bytes_sent~'
                  '$http_user_agent~'
                  '$host~'
                  '$server_port~'
                  '$status~'
                  '$http_referer'
                  '"';
log_format main 'default TENGINE  Message 0 0 : "WEBLOG:~'
                  '$time_local~'
                  '$remote_addr~'
                  '$http_x_client_ip~'
                  '$http_True_Client_IP~'
                  '$request_method~'
                  '$upstream_http_X_Proxy_Cache~'
                  '$uri~'
                  '$query_string~'
                  '$bytes_sent~'
                  '$http_user_agent~'
                  '$host~'
                  '$server_port~'
                  '$status~'
                  '$http_referer~'
                  '$upstream_addr~'
                  '$upstream_status~'
                  '$upstream_response_time~'
                  '$request~'
                  '$request_time';
access_log   syslog:server=10.84.82.30:5555 main if=$loggable;
error_log   syslog:server=10.84.82.30:5556 warn;
# Mime settings
include                         mime.types;
default_type                    application/octet-stream;
# Compression settings - aggressively cache text file types
gzip                             off;
#gzip_comp_level                 1;
#gzip_min_length                 10240;
#gzip_vary on;
#gzip_buffers                    8 64k;
#gzip_types                      text/plain text/css text/javascript text/js text/xml application/json application/javascript application/x-javascript application/xml application/xml+rss application/x-font-ttf image/svg+xml font/opentype;
#gzip_proxied                    any;
#gzip_disable                    "MSIE [1-6]\.";
# SSL PCI Compliance
ssl_session_cache               shared:SSL:10m;
ssl_protocols  TLSv1.2;
ssl_ciphers EECDH+CHACHA20:EECDH+AES128:RSA+AES128:EECDH+AES256:RSA+AES256:EECDH+3DES:RSA+3DES:!MD5;
ssl_dhparam /etc/nginx/ssl/dhparam.pem;
ssl_prefer_server_ciphers       on;
# Error pages
error_page 403 /403.html;
#error_page          404          /error/404.html;
#error_page          502 503 504  /error/50x.html;
# Cache bypass
map $http_cookie $no_cache {
default 0;
~SESS 1;
~wordpress_logged_in 1;
}
# File cache settings
open_file_cache                  max=200000 inactive=20s;
open_file_cache_valid            30s;
open_file_cache_min_uses         2;
open_file_cache_errors           on;
# Other settings
log_subrequest                   on;
rewrite_log                      on;
include                          /etc/nginx/sites-enabled/*.conf;
include                          /etc/nginx/conf.d/*.conf;
}
HaProxy sni bazlı trafik dağıtımı
Routing based on SNI
Aşağıda haproxy için bir ip üzerinden sni özelliği kullanarak forwarding özelliğinin konfig çıktısını bulabilirsiniz.
bu çıktı da ;
- Domainlerimize ait bütün sertifikaların /etc/haproxy/certs/ klasörüne
- cert ve key alt alta aynı dosya içerisinde bulunacak şekilde yüklendikten sonra
http protokolünün sni özelliğini kullanarak farklı endpointlere route etmeyi gösteriyoruz.
#---------------------------------------------------------------------
# Global settings
#---------------------------------------------------------------------
global
    pidfile     /var/run/haproxy.pid
    maxconn     4000
    user        haproxy
    group       haproxy
    #daemon
    debug

#---------------------------------------------------------------------
# common defaults that all the 'listen' and 'backend' sections will
# use if not designated in their block
#---------------------------------------------------------------------
defaults
    mode                    http
    option http-server-close
    option forwardfor       except 127.0.0.0/8
    option                  redispatch
    retries                 3
    timeout http-request    10s
    timeout queue           1m
    timeout connect         10s
    timeout client          1m
    timeout server          1m
    timeout http-keep-alive 10s
    timeout check           10s
    maxconn                 3000

#---------------------------------------------------------------------
# main frontend which proxys to the backends
#---------------------------------------------------------------------
frontend  main
    bind *:80
    acl docs hdr_dom(host) -i docs.mikronet.tech
    use_backend bk_docs if docs
    http-request redirect scheme https code 301 unless { ssl_fc }
    default_backend     bk_docs


frontend mains
        bind *:443 ssl crt /etc/haproxy/certs/
        use_backend bk_owncloud  if  { ssl_fc_sni -i storage.mikroservis.net }
        use_backend bk_owncloud  if  { ssl_fc_sni -i storage.mikronet.tech }
        use_backend bk_corelabs  if  { ssl_fc_sni -i users.corelabs.com.tr }
        use_backend bk_hesk  if  { ssl_fc_sni -i destek.mikronet.tech }
        use_backend bk_docs if { ssl_fc_sni -i docs.mikronet.tech }

backend bk_owncloud
        balance         roundrobin
        mode http
        server owncloud 172.21.23.222:80 check


backend bk_corelabs
        balance         roundrobin
        mode http
        server users_corelabs   192.168.17.90:80 check


backend bk_hesk
        balance         roundrobin
        mode http
        server hesk_server      172.21.23.220:80

backend bk_docs
        balance         roundrobin
        mode http
        server docs_server      172.21.23.239:80 check


#---------------------------------------------------------------------
# Monitoring stats
#---------------------------------------------------------------------
listen stats
 bind *:81
 stats enable
 stats uri /
 stats hide-version
/etc/haproxy #
Namespace kullanarak, glb nin fougue tünel fonksiyonunun operasyon testi
Amaç
GLB ve apisix in aynı makina üzerinde çalışması
Dizayn
Glb, çalışmak ve second chance işini yaptırabilmek adına gue tüneli ve diğer uçta bu tünelden gelen gue headerlarını okuyabilmek için bir kernel modülü kullanır. Bu sayede gue headerdaki second chance verisini modül okur, offline endpointten cevap alamazsa 2nd chance destinasyona yollar.
Sonuç
Olmadı, gue headerlarından destinasyon bilgisi ölçen kernel modülü olan, glb_redirect namespace aware bir modül olmadığından, çalışmadı. Bu tunel üzerinden healthcheck ve http requestlerin işlenmemesine ve sonuçta paketlerin drop edilmesine sebep oldu.
Aşağıda high level örnek planı bulabiliriz.
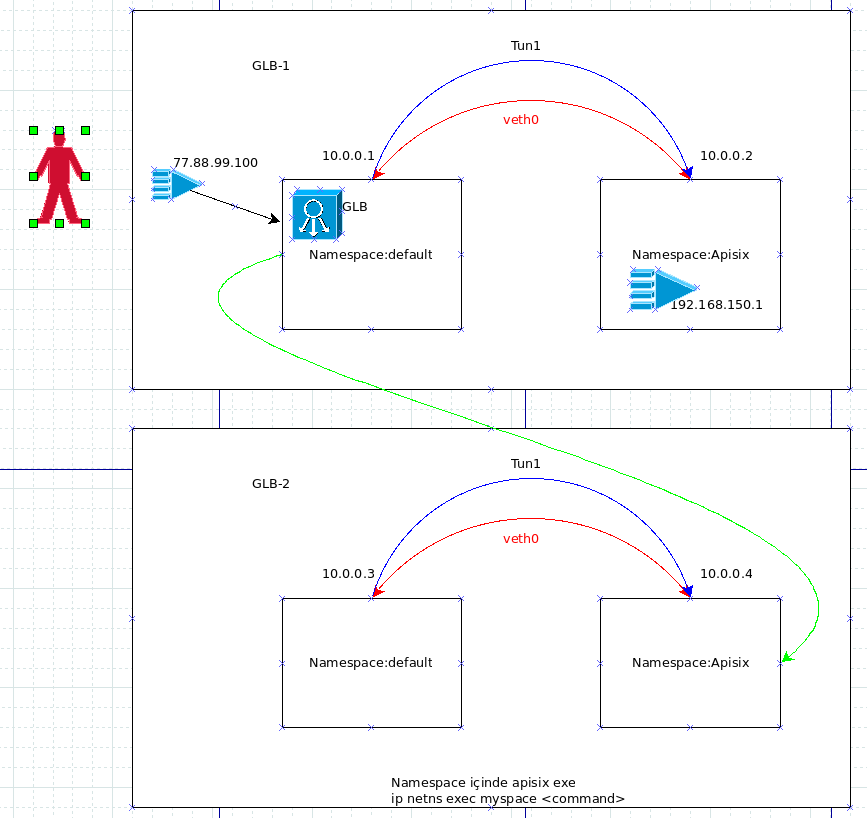
namespace ler arası link için veth lerin oluşturulması ve default namespace için iplendirme.
ip link add veth0 type veth peer name veth1
ip addr add 10.10.10.1/30 dev veth0
ip link set up dev veth0
apisix'in ve kernel modülünün çalışacağı namepsace in oluşturulması, veth pairin iplendirilmesi ve rotalandırma
ip netns add apisix
ip link set veth1 netns apisix
ip netns exec apisix ifconfig veth1 10.10.10.2 netmask 255.255.255.252 up
ip netns exec apisix ip r add default via 10.10.10.1
FouGue tünelinin process edilebilmesi için namespace te modüle redirect
ip netns exec apisix iptables -A INPUT -p udp -m udp --dport 19523 -j GLBREDIRECT
Default namespace ten apisix namespace e fougue tüneli kurulumu ve up edilmesi
modprobe fou
ip fou add port 19523 gue
ip link add name tun1 type ipip remote 10.10.10.2 local 10.10.10.1 ttl 225 encap gue encap-sport auto encap-dport 19523
ip link set up dev tun1
apisix namespace te http listener
ip netns exec apisix nc -l 80 < index.html
Hızlı bir demo için youtube'dan izleyebilirsiniz
Temel Nginx konfigürasyonu
Aşağıda temel konfigürasyon dosyası içeriğini bulabilirsiniz.
server {
              listen 80 default_server;
                      listen [::]:80 default_server ipv6only=on;
              root /var/www/default;
              index index.html index.htm;
              # Make site accessible from http://localhost/
              server_name localhost;
              location / {
                      # First attempt to serve request as file, then
                      # as directory, then fall back to displaying a 404.
                      try_files $uri $uri/ =404;
                      # Uncomment to enable naxsi on this location
                      # include /etc/nginx/naxsi.rules
                      }
      listen 443;
              server_name somecustomer.com.tr www.somecustomer.com.tr somecustomer.com www.somecustomer.com;
              root /var/www/default;
              index index.html index.htm;
              access_log /var/log/nginx/somecustomer-access.log-ssl-access.log;
              error_log /var/log/nginx/somecustomer-access.log-ssl-error.log;
              ssl on;
              ssl_certificate /etc/keys/somecustomer/www.somecustomer.com.tr.chained.crt;
              ssl_certificate_key /etc/keys/somecustomer/www.somecustomer.com.tr.key;
              ssl_session_timeout 5m;
              ssl_protocols TLSv1 TLSv1.1 TLSv1.2;
              ssl_ciphers "HIGH:!aNULL:!MD5 or HIGH:!aNULL:!MD5:!3DES";
              ssl_prefer_server_ciphers on;
              if ($http_user_agent ~ "Windows 95|Windows 98|biz360.com|xpymep|TurnitinBot|sindice|Purebot|libwww-perl")  {
                      return 403;
                      break;
              }
              location / {
                      proxy_redirect off;
                      proxy_set_header X-Real-IP $remote_addr;
                      proxy_set_header X-Forwarded-For $proxy_add_x_forwarded_for;
                      proxy_pass http://iis;
                      proxy_set_header Host $http_host;
                      access_log      /var/log/nginx/somecustomer-access.log;
                      error_log       /var/log/nginx/somecustomer-error.log;
                      proxy_set_header   X-Forwarded-Port 443;
              }
              location /blog/ {
                      rewrite ^ http://$host$request_uri? permanent;
              }
}
Http sunucu kontrol modülü ile NGINX kurulum ve konfigürasyonu
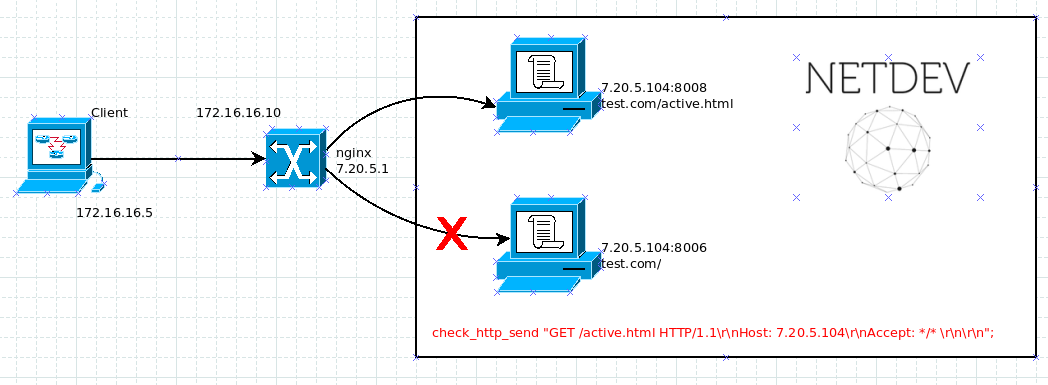
Bu yazıda, nginx i sunuculara aktif health check yollayacak şekilde derleyip kuruyoruz, sistem fedora36 rolling.
Config ve binary dosya /usr/local/nginx altında oluşacak dolayısı ile aşağıdaki bütün adımlar dosyların bu klasörde biriktiğini kabul eder.
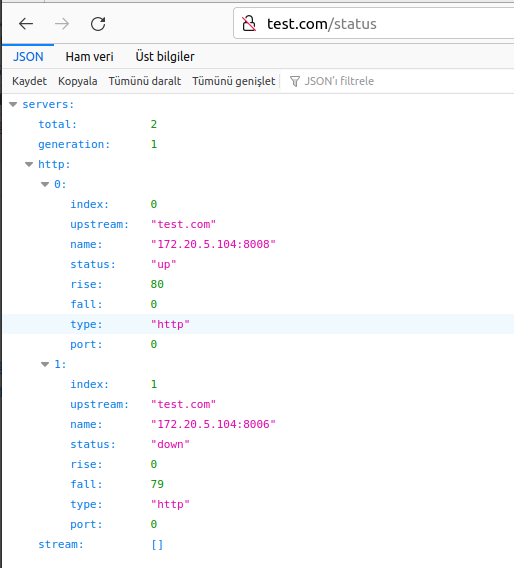
kurulum sonunda aşağıdaki gibi bir "status page" de elde ederiz
İşletim sisteminin eksiklerini yükle
eksik olan işletim sistemi paketlerini yüklüyoruz.
sudo yum install epel-release
sudo yum install git
sudo yum  group install "C Development Tools and Libraries" "Development Tools"
derleme için eksikleri kütüphaneleri yükle
Aşağıdaki kütüphaneler fedora36 da yüklü gelmiyor nginx için yüklü olmaları gerekiyor.
sudo yum install pcre-devel
sudo yum install zlib-devel
sudo yum install  openssl-devel
Uyumlu nginx ve http_health_chek modülünü klonla
Sadece aşağıdaki sürümü test ettim, daha yeni sürümler için çalışma yapmak gerekir.
git clone https://github.com/nginx/nginx.git
git clone https://github.com/zhouchangxun/ngx_healthcheck_module.git
git checkout branches/stable-1.12
Derleme
Derleme aşaması burada başlıyor
git apply ../ngx_healthcheck_module/nginx_healthcheck_for_nginx_1.12+.patch
./auto/configure --with-stream --add-module=../ngx_healthcheck_module/ --with-http_ssl_module
sudo make && sudo make install
cd /usr/local/nginx/
systemd
lokasyon olarak kayıt edilecek yer
/usr/lib/systemd/system/nginx.service
Unit file içeriği ;
[Unit]
Description=The NGINX HTTP and reverse proxy server
After=syslog.target network-online.target remote-fs.target nss-lookup.target
Wants=network-online.target

[Service]
Type=forking
#PIDFile=/usr/local/nginx//nginx.pid
GuessMainPID=1
ExecStartPre=/usr/local/nginx/sbin/nginx -c /usr/local/nginx/conf/nginx.conf -t
ExecStart=/usr/local/nginx/sbin/nginx -c /usr/local/nginx/conf/nginx.conf
ExecReload=/usr/local/nginx/sbin/nginx -c /usr/local/nginx/conf/nginx.conf -s reload
ExecStop=/bin/kill -s QUIT $MAINPID
PrivateTmp=true
User=root

[Install]
WantedBy=multi-user.target
Servisleri başlatalım
sudo systemctl daemon-reload
sudo systemctl status nginx
Standart nginx conf dosyası
lokasyonu :
/usr/local/nginx/conf/nginx.conf
içeriği ;
user  root root;
worker_processes  1;
error_log  logs/error.log  info;
#pid        logs/nginx.pid;

events {
   worker_connections  1024;
}

http {
   include /usr/local/nginx/conf/conf.d/*.conf;
}

stream {


}
Load balance ile ilgili config
Lokasyonu :
/usr/local/nginx/conf/conf.d
Dosyanın içeriği:
Server {
location /status {
            healthcheck_status json;
        }
location / {
          proxy_pass http://test.com;
        }
}
upstream test.com {
        # simple round-robin
        server 7.20.5.104:8008;
        server 7.20.5.104:8006;

    check interval=3000 rise=2 fall=5 timeout=500 type=http;
    check_http_send "GET /active.html HTTP/1.1\r\nHost: 172.20.5.104\r\nAccept: */* \r\n\r\n";
    check_http_expect_alive http_2xx http_3xx;
}
Kaynak
https://github.com/zhouchangxun/ngx_healthcheck_module#installation
Debug custom rules using http headers with haproxy
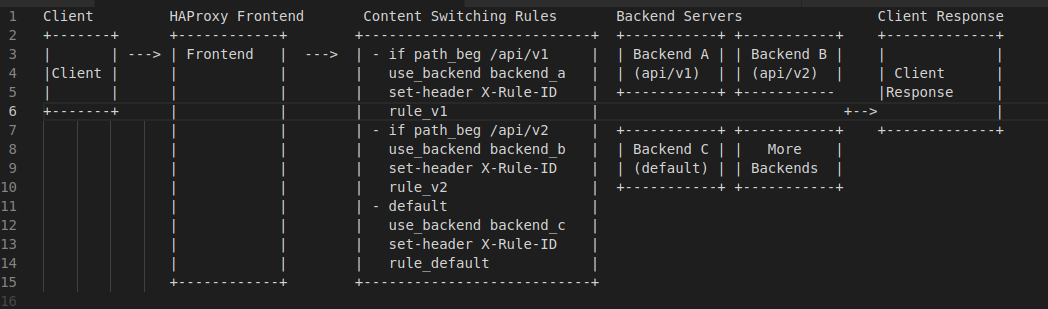
Step 1: Define a Custom Header
You can use HAProxy’s http-request set-header directive to add a custom header to requests passing through HAProxy. This header can contain information like a rule ID or a Lua snippet identifier.
in the end you should have something like this
Step 2: Log the Custom Header
Configure the logging format to include the custom header, so it gets logged.
Example Configuration
Here's an example configuration that demonstrates how to set a custom header and log it.
1. Define the custom header in the frontend or backend section
frontend http_in
    bind *:80
    mode http

    # Insert custom header with rule ID
    http-request set-header X-Rule-ID %[unique-id]

    default_backend servers

backend servers
    mode http

    server server1 192.168.1.100:80 check
In this example, the header X-Rule-ID is added to each request with a unique ID (you can customize the value as needed).
2. Customize the log format to include the custom header
global
    log 127.0.0.1 local0

defaults
    log global
    option httplog
    log-format "%ci:%cp [%t] %ft %b/%s %TR/%Tw/%Tc/%Tr/%Tt %ST %B %CC %CS %tsc %ac/%fc/%bc/%sc/%rc %sq/%bq %hr %hs %{+Q}r %ST %B %H %{+Q}r %hr %hs %{+Q}r %ht(X-Rule-ID)"

frontend http_in
    bind *:80
    mode http

    # Insert custom header with rule ID
    http-request set-header X-Rule-ID %[unique-id]

    default_backend servers

backend servers
    mode http

    server server1 192.168.1.100:80 check
In the log format, %ht(X-Rule-ID) is used to log the value of the X-Rule-ID header.
Using Lua to Set Headers
If you need more complex logic for setting the header, you can use a Lua script:
1. Enable Lua support in HAProxy
Ensure your HAProxy is built with Lua support. You can check this by running haproxy -vv and looking for Built with Lua.
2. Create a Lua script (/etc/haproxy/lua/add_header.lua)
core.register_action("set_rule_id", { "http-req" }, function(txn)
    txn.http:req_set_header("X-Rule-ID", "your_rule_id_or_identifier")
end)
3. Update the HAProxy configuration to use the Lua script
global
    lua-load /etc/haproxy/lua/add_header.lua
    log 127.0.0.1 local0

defaults
    log global
    option httplog
    log-format "%ci:%cp [%t] %ft %b/%s %TR/%Tw/%Tc/%Tr/%Tt %ST %B %CC %CS %tsc %ac/%fc/%bc/%sc/%rc %sq/%bq %hr %hs %{+Q}r %ST %B %H %{+Q}r %hr %hs %{+Q}r %ht(X-Rule-ID)"

frontend http_in
    bind *:80
    mode http

    # Call Lua script to set the header
    http-request lua.set_rule_id

    default_backend servers

backend servers
    mode http

    server server1 192.168.1.100:80 check
In this configuration:
- The Lua script sets the
X-Rule-IDheader. - The log format includes the custom header.
Sample access.log output
There are rule identifiers at the end of every line like rule_v2 or rule_v1
192.168.0.1:54321 [11/Jun/2024:15:23:45.123] http_in backend_a/server1 0/0/2/3/5 200 1234 - - ---- 2/1/0/0/0 0/0 "GET /api/v1/resource HTTP/1.1" 200 1234 - - ---- %{+Q}r %hr %hs %{+Q}r rule_v1
192.168.0.2:54322 [11/Jun/2024:15:23:46.456] http_in backend_b/server2 0/0/3/4/7 200 2345 - - ---- 2/1/0/0/0 0/0 "GET /api/v2/resource HTTP/1.1" 200 2345 - - ---- %{+Q}r %hr %hs %{+Q}r rule_v2
192.168.0.3:54323 [11/Jun/2024:15:23:47.789] http_in backend_c/server3 0/0/1/2/3 404 345 - - ---- 2/1/0/0/0 0/0 "GET /other/resource HTTP/1.1" 404 345 - - ---- %{+Q}r %hr %hs %{+Q}r rule_default
Summary
By configuring HAProxy to set custom headers and customizing the log format to include these headers, you can effectively log custom identifiers, rule IDs, or other information that may be critical for your debugging and monitoring purposes. This setup provides a powerful way to gain insights into how requests are being processed and routed through your HAProxy instance.