A10 System Administration Training
This book is about initial training of A10 devices and ACOS operating system
- Introduction
- Course Details
- How are we going to learn
- About tutor
- About Acos and A10networks
- Product line up
- Features
- Course sandbox setup
- First Time
- Administration tasks
- Backup System Configuration
- Upgrade system OS
- Downgrade System Os
- Set time or use NTP
- What is VCS
- Certificate Management
- User Management & Access LDAP/TACACS
- Basic server load balancing
- What is server load balancing
- Acronyms and their details
- Creating Real servers
- Creating Service Groups
- Creating Virtual Servers
- Configuring traffic distribution
- XFF or x-forwarded-for
- Https and ssl
- Certificate Management & Pki
- SSL-Offloading
- High availability
- Appliance access management
- Basic monitoring & troubleshooting
- Automation
- SNMP v2-v3
- Logging and log destinations
- Partitions
Introduction
Course Details
Target
This course is targeted for ;
- Computer Network administrators
- Network or security engineers
- IT Technicians
- Basically, people that like to have knowledge on traffic load balancing and management
Requirements
- Basic knowledge on tcp/ip and ethernet networks
- Basic understanding of http protocol
- Basic knowledge about linux web servers like apache or nginx
Achievements
After you complete this training
You will be able to;
- Setup and install a10 devices
- Do administration tasks
- Create basic load-balancing solutions
- Secure connections
- Automate repetitive tasks using ansible or python
- Troubleshoot and monitor a10 devices using command line and observium.
Structure
It is as basic as it can be, i am going to explain a detail or a feature and you will do it on your lab and after you complete the lab, i will ask 5 to 8 questions about things i told and you'll measure your understanding about that section.
How are we going to learn
Basics
As far as i know, the best way to learn is by doing. And i mean by doing is to do every configuration one by one. I am going to supply all the configurations using a public github repo but i must say again best way to learn ACOS is to do the configuration by typing just like coding.
The playground
we are going to use gns3 to create our playground and configuration testing There will be a section about how to construct the lab so we can easiliy test our configurations
In this training you will be supplied two files,
- A gns3 lab file that has all the required setup to be able to finish this course
- A list of to-do's before you must do to work with this training like downloading some files and uploading them to gns3 before we go on with the training.
Course materials
Every required is supplied through a zip file after you extract it, you can find all the needed config files or any other materials there.
About tutor
I am a, self educated, network engineer that has experince more than 20 years. I've been working at system integrators for 10 ten years and right now own one for more than 15 years.
I am not a certified trainer or anything else.
About Acos and A10networks
A10 networks
A10 Networks is a U.S. public company specializing in the manufacturing of application delivery controllers (software and hardware). Founded in 2004 by Lee Chen, co-founder of Foundry Networks, A10 originally serviced just the identity management market with its line of ID Series products. In early 2007, they added bandwidth management appliances (EX Series). The company had its initial public offering on March 21, 2014, raising $187.5 million.
In May 2013, A10 launched its A10 Thunder Series platforms of hardware and software application delivery controllers (ADCs)
A10 Networks released the Harmony design of the Thunder Series ADC in 2015.
Also in 2015, A10 Networks upgraded the Advanced Core Operating System (ACOS). The update allowed 100 percent of software capabilities to be addressed by APIs, whereas the previous ACOS could only address 40 percent through APIs.
In 2016, A10 acquired the cloud-native ADC company Appcito.
Acos
Acos is an 64 bit operating system that has powerfull features like
- multitenancy,
- form free (bare-metal, virtual, physical)
- flex licensed
that can do;
- application delivery
- Transparent ssl decryption and re-encryption
- Authorization and authentication
- Firewalling
https://www.a10networks.com/solutions/advanced-core-operating-system/
Product line up
Features
Course sandbox setup
Trainig Scenario & Topology
This training is best used with the gns3 lab supplied with lab that you can find below
Building the playground
topology
Connectivity and logon details
asbru için config sağla import edilebilir
securecrt için sağla
System configuration and downloading tools
In this section we are going to need a computer with the following minimum requirements:
- windows 10
- 4 cores
- 8 gb ram
- 120 disk space
You will need to download gns3 and to do that you are going to create an account at gns3.org using this link
---link---
after you created the account,
Please download gns3 from this link :
---link2---
I've made a lab and shared it over gdrive so you can download it but please note that this lab is 45 gigbytes large and you should download it through your unmetered connection. Again please don't download this over your cellular tethered wifi connection.
download the lab linked here;
---link3---
And last download is the configuration files for machines in the lab which are very small in this link
---link4---
Tools and installation
In this section we are going to ;
- install virtualbox
- install gns3
- import the lab
- install vnc viewer
- install spice client
we are going to learn;
- Start/stop the lab
- connect to virtual lab machines
First Time
Unboxing
Physical devices
- contents
- required tools
- Physical installation requirements
Virtual edition
- Licensing
- Sizing
installation
- VMWare
- Qemu/KVM installation
- GNS3
- Eve-ng installation
Management Access
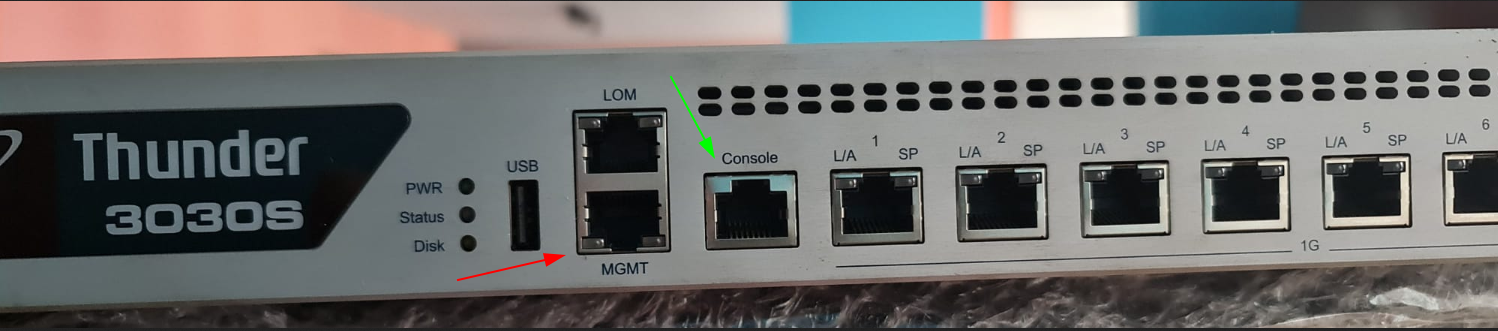
Console port details
This is the "monitor" port of this device, with a terminal emulator and a serial console cable, you can access the device.
Console port is at the front of the device which is called "Console". and it is shown with green arrow here, You should remember that devices and the location of console ports vary depending to the model of device.
Most of the time it is called Console, but some vendors might use acronyms lik "Con", "IOIOI"
To be able to that you'll need to set the configuration of the port to
- Speed/baudrate: 9600
- data bits : 8
- stop bits: 1
For windows you can use putty and for linux gtkterm is a good option, if you are a mac user you can user a tool like Serial2
Management ethernet port details
Management port is a special port seperated from the device's main thing, you'll need this port to access the device remotely or using an ethernet/ip connection.
The default settings are;
- ip address is 172.31.31.31
- user: admin
- password: a10
Management access
You can connect to the device using https and ssh protocols, there is another way which is api access and we have a special section to show you how it's used.
Using ssh
for ssh you can use putty in windows and openssh for remaining platforms
Using https
For https the only need is a modern browser,
Registration, licensing and flexpool
Physical devices
All physical devices that A10networks ships, comes with ADC -Application Delivery Controller- license. And if you'd like use additional features like datacenter firewall, supplied web categories, etc.. you will need to purchase additional licenses like
- Webroot
- CFW
The methods to obtain these license will be listed later. The registration will be done on purchasing, by a a10networks salesperson. They will ask for a e-mail address to register the lead and the shipments. You will use that mail address to work with RMA or guarantee requirements.
Note : By default no physical device requires internet connectivity to work in ADC mode. And to unlock additional licenses / features you'll have to allow the device reach either from data ports or from management port to internet.
Virtual appliances
Virtual appliances downloaded from internet or by applying to trial comes with limited to 10 mbit througput and ADC features only To use the virtual appliances fully, you'll need to have trial key or paid licenses which are activated with GLM. To obtain licenses, you'll have to supply a contact mail address and use that mail address to login what we called GLM.
GLM and why we need it for ?
GLM which is Global License manager is a platform from A10networks that manages all this registration, licensing and other bureocratic stuff and also enables something called Flexpool, it resides on https://glm.a10networks.com .
Flexpool
You can buy your license in Throughput not in per device mode. This feature of a10networks allows comissioning many devices sharing one throughput and it is very effective when it comes to create High availability scenarios. It is used by sharing a "GLM Token" through out the devices.
Administration tasks
Backup System Configuration
copy config
With this option you can only take a configuration backup, a complete backup includes ;
- SSL certificates
- User passwords
- PKI Infra passwords
- Logs
This type of backup is not a complete backup but it is better than nothing.
To take a quick configuration backup and according the length of your configuraiton, you can;
- copy/paste
- record serial terminal or ssh session output
backup using gui
backup to ftp server
automated backup jobs
Upgrade system OS
Downgrade System Os
Set time or use NTP
What is VCS
Certificate Management
User Management & Access LDAP/TACACS
Basic server load balancing
What is server load balancing
Acronyms and their details
Creating Real servers
Creating Service Groups
Creating Virtual Servers
Configuring traffic distribution
XFF or x-forwarded-for
Https and ssl
Certificate Management & Pki
SSL-Offloading
High availability
A-VCS
What is A-VCS
It is the acronym of ACOS Virtual Chassis Systems.
It is a special process created to manage many ACOS devices from a single-point view however it is not the only use case. It also synchronizes ;
- Configurations
- Certificates
- Keys
- Aflex Policies
- Black/Whit lists
- Code/Firmware versions.
You must always remeber that l2 level configurations like ethernet LAG interfaces vlan tags vlan names is not in sync process. We'll get to reason of this later
Remember, A-vcs does not do anything about live traffic, configuration only !
Prequisites
- A-vcs is a multicast helped operation so all devices must be in same L2 domain
- VCS Can operate between different geographic regions so it is not delay bound to a threshold
- As told before avcs candidate's must have the same version of ACOS on same partition's. You can't run same ACOS version on Differen partitions
- Vrrp-a will be enabled when using A-vcs, if you ever need to create a a-vcs cluster on a L2 domain that also has another a-vcs cluster be sure to check machine mnd cluster ids first
- A Floating ip is used to manage the devices. You will have to use an additional ip addres when you choose to use A-vcs
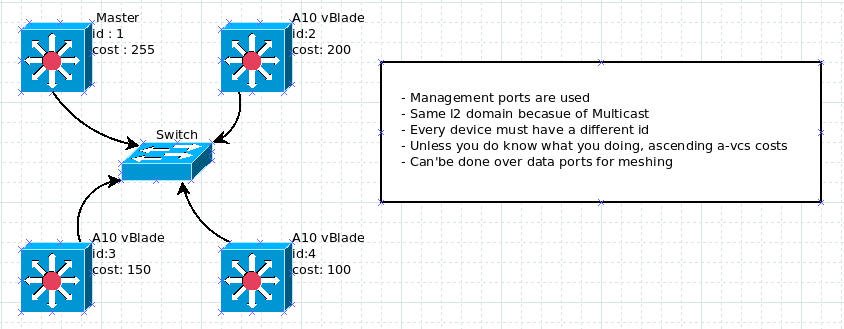
Master / Slave / Election
- Master device is the one with expensive a-vcs cost , others are called vBlades not slaves. So if you have 3 devices with same vcs cost or cost unconfigured, vcs id decides whichever is going to be the master.
- The bigger a-vcs cost wins the election regardless of device id
- If by some reason you have same cost on v-blades, the one with smaller a-vcs id will become master in case of losing master.
- Vblades are subscribers, master sends heartbeats to vblades, if by some reason this heartbeat can't reach vblades, the election begins.
We'll do a demo of this later in the training.
You will see all the devices in config context with their respective machine id's you will configure later in this training.
You can login to vblades without going thorugh floating ip however all the changes will be forced to done through floating ip
You can use Management port only to create a a-vcs cluster. Any l2 implementation will continue to work.
Split Brain on more than 2 device clusters
This is a dangerous situation. If by some reason the devices decide to become masters at same time any traffic processing will create network problems. So at all times the necessary precautions must be taken like
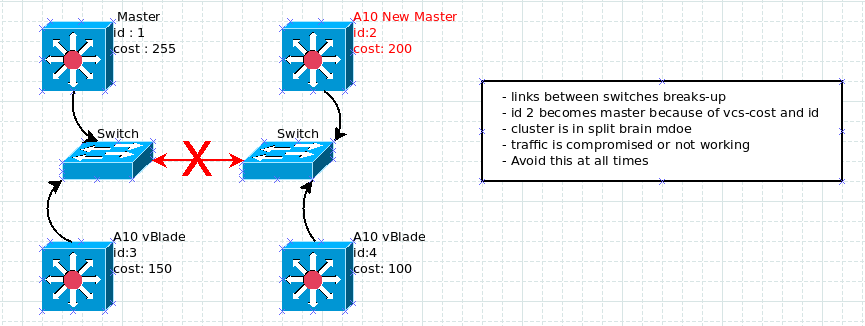
- having a mesh connected a-vcs link configuration
- Minimum device count
Initial config of a-vcs
On the master device
-
Enable the vrrp to start configuring vcs we have to enable vrrp-a first
ACOS# configure ACOS(config)# vrrp-a common ACOS(config-common)# set-id 1 ACOS(config-common)# device-id 1 ACOS(config-common)# enable ACOS-Active(config-common)# exit ACOS-Active(config)# -
Enable a-vcs
ACOS-Active(config)# vcs enable ACOS-Active(config:1)# -
configure the floating ip address
ACOS(config:1)# vcs floating-ip 192.168.16.10 /24 -
Configure a-vcs with masters parameters After the confgiuration commands typed in, you'll need to do vcs reload to start a-vcs formation process.
 ACOS(config:1)# vcs device 1
 ACOS(config:1-device:1)# interfaces management
 ACOS(config:1-device:1)# priority 225
 ACOS(config:1-device:1)# enable
 ACOS(config:1-device:1)# exit
 ACOS(config:1)# vcs reload
adding second device to cluster
On first blade
adding third device to cluster
On second blade
adding fourth device to cluster
On third blade
forced a-vcs master commands
Force vBlade-1 to become master